Quite a while ago I reviewed the HE3D K280 delta 3D printer. Up until now, I did no mods other than the ones that I completed during the initial build. I have been very happy with it with the exception of the noise caused by inexpensive drivers and the salmon skin due to the drivers as well. The K280 prints big and pretty accurate at modest speeds. Today I am outlining how I upgraded to a Duet 2 Maestro mainboard.
With this upgrade, I am jumping from an 8-bit board with generic drivers to a 32-bit board with TMC2224 drivers. The upgrade was quite painless and straightforward but not without a few hiccups. The Maestro is Duet’s entry-level board for about $130. I attempted the Bigtreetech SKR 1.3 with TMC2130’s but the firmware wasn’t quite there yet.
I opened an issue on Marlin’s GitHub page which explains the issue in detail here. I only had one major issue with the Duet 2 Mastro board but it was kind of a duh moment when I found the solution and will talk about that more in a bit.
Connections

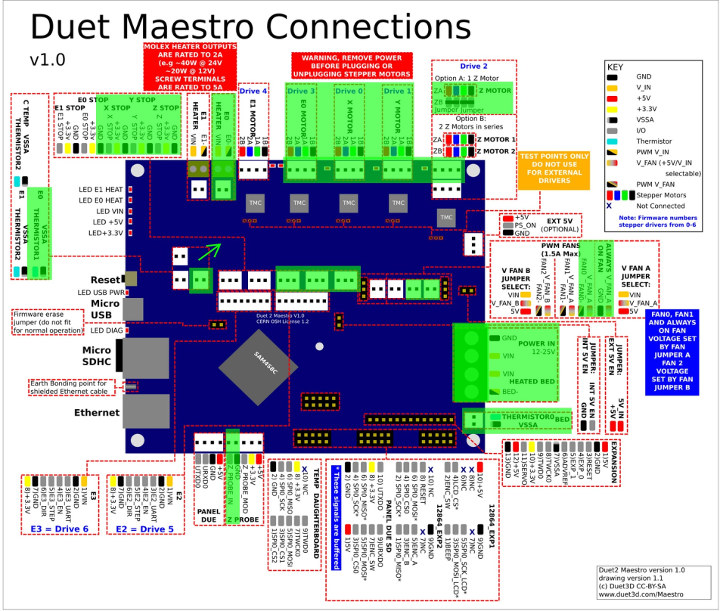
Changing from the stock board to the Duet 2 Maestro is almost plug and play. The board doesn’t fit exactly but I was able to get 2 opposing screws and spacers installed. The Maestro came with connectors needed but I was able to use the existing connectors on the cables. The pin pitch is correct just the latching mechanism is different.
The K280 came with endstops configured normally open with the center pin and the outside pin. I moved the center pin to the other outside pin to work with the Maestro.
I highlighted all the connections I used in green and a picture below so you can check orientation. Just be sure to make electrical connections polarity correct. Please note that the arrow indicates that the thermistor location on the board and the pinout diagram are slightly off. The 3 connections slide up and to the right.
Configuring
Configuring the duet is done completely by G-code files. Below are the 3 G-code files needed to get started with the K280. First, take the SD card that came with the duet and mount it on your pc and navigate to the sys folder and create these 3 .g files. I recommend notepad++ for this. Modify the network settings for your network. I made the mistake when I started working on this and did this all by hand. It was good and bad.
It took quite some time but the config is very clean with no extras. I commented everything to make it easy to modify. There is a web tool for this here which can make this easier for configuring another printer. After creating these and making all the connections we can move onto updating the firmware. Unmount the SD card and insert it into the Duet 2 Maestro board and power on.
Source: https://www.cnx-software.com/2019/11/05/how-to-install-duet-2-maestro-board-on-he3d-k280-3d-printer/
Great post, really like it. Thanks for sharing.
ReplyDelete